If you have ever opened your Task Manager, looked at the Performance tab, and panicked because your “Available” memory seems low while your “Cached” memory is effectively eating up gigabytes of RAM, you are not alone. A common scenario for users with 16GB or 32GB of RAM is seeing 6GB+ sitting in a “Cached” state. Is this a memory leak? Is your computer slowing down?The short answer is: Probably not. But if you are experiencing stuttering in games or heavy applications, that cache might actually be the culprit. Here is everything you need to know about cached memory and how to manage it.
Reducing Cached Memory
- What is Cached Memory? (The “Unused RAM is Wasted RAM” Philosophy)
- Why Would You Want to Clear It?
- How to Clear Cached Memory in Windows 10 & 11
- Clearing Cached Memory:
What is Cached Memory? (The “Unused RAM is Wasted RAM” Philosophy)
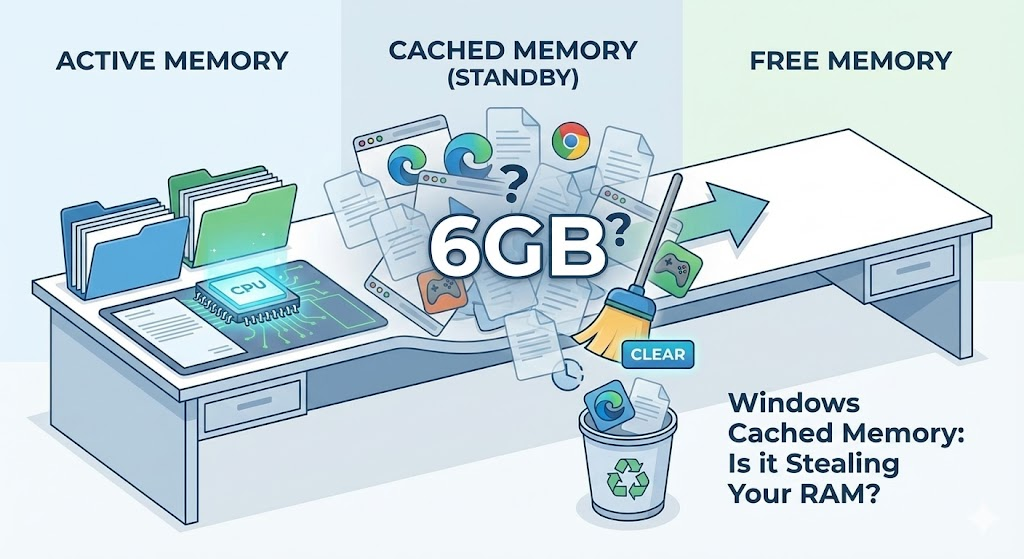
To understand cached memory, you have to understand how Windows manages resources. Microsoft follows a simple philosophy: Empty RAM does nothing for you. If you have 16GB of RAM and you are only using 4GB, the other 12GB is sitting idle. To make your computer faster, Windows takes that idle space and fills it with files, apps, and data you use frequently. This is called Cached Memory (or the Standby List).
The “Office Desk” Analogy
Think of your RAM as a physical desk:
- Active Memory: The files currently open on your desk that you are working on.
- Free Memory: Empty space on the desk.
- Cached Memory: Documents you might need soon, stacked neatly in the corner of the desk.
If you need that desk space for a new project (a new game or app), Windows instantly swipes those cached documents into the trash to make room. Ideally, cached memory is “free” memory that is just being useful while it waits.
Why Would You Want to Clear It?
If Windows manages this automatically, why does “How to clear cached memory” get thousands of searches a month? Because sometimes, Windows gets lazy.
Occasionally, when a heavy application (like a modern AAA game) requests more RAM, Windows doesn’t release the cached memory from the “Standby List” fast enough. This causes the system to write data to your slow hard drive (Page File) instead of your fast RAM, resulting in:
- Micro-stutters in games.
- Input lag.
- Sudden FPS drops.
If you face these issues, manually clearing the cache can help.
How to Clear Cached Memory in Windows 10 & 11
Note: You do not need expensive “RAM Booster” software. Those often do more harm than good. Use these trusted, free tools instead.
Method 1: RAMMap (The Official Microsoft Way)
RAMMap is a tool from Microsoft’s Sysinternals suite. It gives you a deep look into your memory and lets you clear it instantly.
- Download RAMMap from the official Microsoft website.
- Extract the ZIP file and run
RAMMap.exeas Administrator. - Go to the Empty tab in the top menu bar.
- Click Empty Standby List.
You will see your “Cached” memory in Task Manager drop to almost zero instantly.
Method 2: Intelligent Standby List Cleaner (The Gamer’s Choice)
If you don’t want to manually clear the cache every time you launch a game, use ISLC (Intelligent Standby List Cleaner). This is a favorite tool among PC optimization enthusiasts.
- Download ISLC from the official Wagnardsoft developer site.
- Open the application.
- Look for the settings: “Free memory is lower than” and “The list size is at least.”
- Set the list size to 1024 MB (1GB).
- Click Start.
Now, whenever your cached memory gets too bloated, ISLC will automatically purge it in the background without you lifting a finger.
Clearing Cached Memory:
Sometime clearing cached memory is useful as it deletes the standby list and frees up the memory. Though it will go back in time you might get performance improvements from time to time by clearing the cached memory. If your system runs smooth, let Windows do its job. But if you are chasing every last frame per second or experiencing stutters, the tools above are the safest way to reclaim your RAM.