As you all know Moon is the only natural satellite of the earth and spacecrafts from different countries have photographed Moon over the last 60 years. Let us see here how to browse or view those images which are publicly available from NASA/ISRO & other organizations
NASA’s LRO Satellite has been orbiting Moon from 2010 and it has captured nearly 98.2% of Moon’s surface excluding Moon’s surface and these maps are readily available for Public and the LRO’s images are released monthly
Moon Map Link : https://quickmap.lroc.asu.edu/
Let us see how to view those images and see the high resolution images of those
Step 1: Go to Quickmap link
Step 2: Once the map of Moon is loaded click on the top left as marked in Redbox

Step 3: You will get the below options (These are different kind of projections by which you can see the map). Here Equidistant Cylindrical projection is one of the best as it allows you to view the entire map of Moon’s surface similar to what we have in Google Maps

Step 4: Click on “Equidistant Cylind” projection
Step 5: Once you click on it, you will get to see something like this

The above projection is at 500m/pix and on top left bottom it shows the latitude and longitude of any point as you do a mouse hover over that point.
Now let us see about how to view the images of any area on the Moon’s surface that has been captured at different times by NASA’s LRO. And now I am doing to Zoom into to Apollo17th’s landing spot and see the descent lander that is still in intact condition
Apollo 17th’s lander location is one of the easiest to identify on Moon’s surface (Below image is at 100 km/pix resolution)

When you zoom in the same spot little further you will be able to see like this (This one is 20 km/pix resolution)

And when you zoom in further, you can see something like this at 5 km/pix resolution

And now let us zoom in further and see the landing spot of Apollo17th and view the images captured by LRO at different resolutions and the below image is at 200m resolution

Once you zoom in further you can see the landing spot of Apollo17th’s as shown

Now let us select the area of the Apollo17th’s Descent

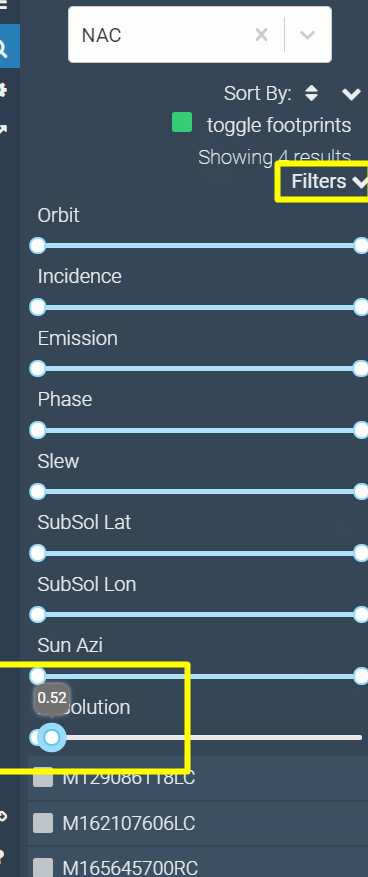
Once you have selected the area and double clicked on it, choose the NAC option from the below dropdown

After you have selected “NAC” it will display all the images that has been captured by NASA’s LRO orbiter of the particular area from 2009. You can also filter those images with different options like Sun’s Azimuth angle, incidence etc., and along with resolution (which is the most important filter) .
Choose the resolution filter as 0.5 after clicking on Filters. This will display only images that has a resolution of less than 0.52 m/pix (Lower the resolution value we will get high resolution pictures)
And then choose one by one the images listed below , The below one is the 1st image (M129086118LC)

And this is another image of the same spot where you can see the Lunar Descent module clearly.

Apart from these, you can click on the image individually, see the other details and then click on individual image’s link to view the image separately

The below link can be also directly accessed instead of through quickmap – http://wms.lroc.asu.edu/lroc/view_lroc/LRO-L-LROC-3-CDR-V1.0/M129086118LC
Once you access the image, it will display like shown below

From the top left side you can also download the TIF version of image and open it using any of the normal image viewers like Windows Photo Viewer or mspaint or Paint.NET etc.,
And you can also zoom in on the url here and see the Descent module, the only disadvantage is it won’t have latitude & longtitude which makes it difficult to browse through the image here – http://wms.lroc.asu.edu/lroc/view_lroc/LRO-L-LROC-3-CDR-V1.0/M129086118LC

The above said steps are one of the easiest ways to browse through a spot on Moon and see the images captured on “Moon”. There are also many other ways by which we can see the LROC images. There are also EDR’s which can be downloaded and processed by ourselves to see the image